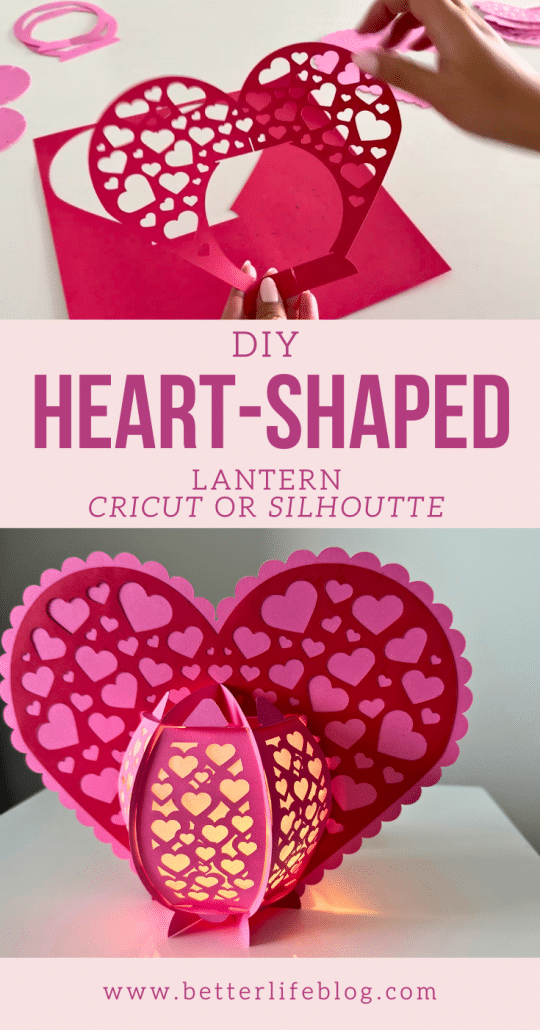
This DIY Heart Lantern gives off a soft, romantic glow – perfect for Valentine’s Day decor, wedding centerpieces, or a heartfelt handmade gift.
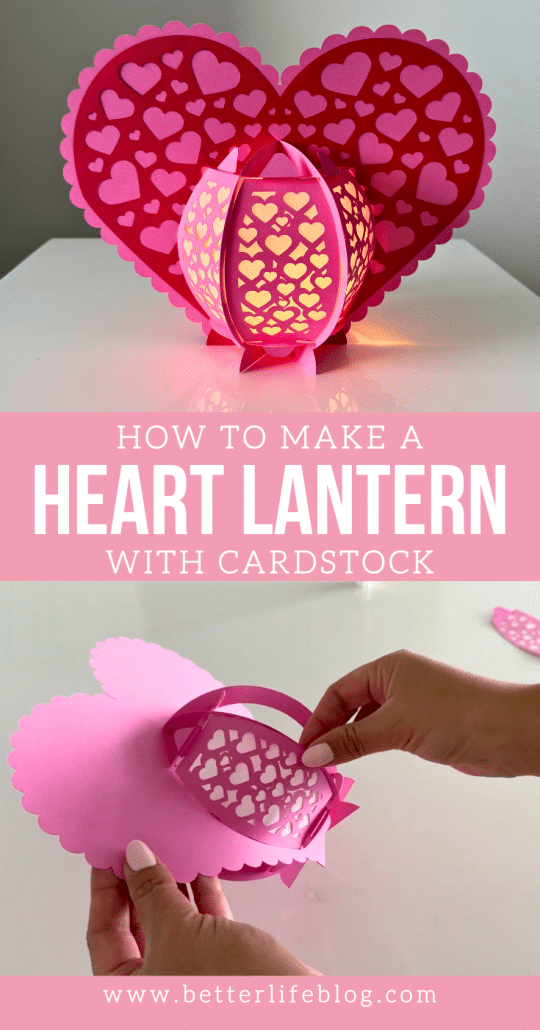
Looking for a beautiful and easy Cricut craft for Valentine’s Day? Then you must make our DIY Heart Lantern – it’s seriously the perfect paper project!
Welcome back, crafty friends! Thanks for stopping by! My name is Nancy, your go-to crafting expert and the designer and founder of Better Life Blog.
This tutorial will guide you step-by-step on how to create this elegant 3D paper lantern using your Cricut machine. You can purchase the file here or you can download it for free by joining our VIP Crafters Club. This exclusive membership gives you unlimited access to hundreds of our original SVGs files, as well as access to our online community, and monthly crafting parties!

What is a Cricut Paper Lantern?
A Cricut paper lantern is a 3D craft project created using layered cardstock and vellum paper to form a hollow lantern-like structure. This particular Heart Lantern design features delicate heart cutouts that allow soft light to shine through, making it a stunning decorative piece.

Unlike traditional lanterns, this paper version is lightweight and safe—simply place a battery-powered LED tea light inside, and it will give off a warm, cozy glow without the risk of an open flame!
What Can You Use This Heart Lantern For?
This DIY Cricut Heart Lantern is perfect for a variety of occasions, including:
✔ Valentine’s Day Home Decor – Set the mood with soft, glowing lights.
✔ Wedding Decorations – Elegant, handmade centerpieces for a romantic ambiance.
✔ Anniversary Surprises – A heartfelt handmade craft for your special someone.
✔ Party Decorations – Add charm to engagement parties or bridal showers.
✔ Gifting – Fill the lantern with chocolates or small gifts for a unique present.
Since the Heart Lantern SVG is fully customizable, you can make it in any color or size to fit your theme!

Supplies You’ll Need
To make this Heart Lantern, you’ll need:
- Cricut Machine (Maker or Explore) or Silhouette
- Heart Lantern SVG File (Download it here or access it in our VIP Crafters Club!)
- Cardstock (65 lb+ for a sturdy lantern)
- Standard cutting mat
- Vellum Paper (for that soft glowing effect)
- Glue (we recommend precision glue like Bearly Art, a glue stick or a hot glue gun for this project)
- LED fairy lights or an LED tea light (for safe illumination)
💡 Pro Tip: Try using metallic or pearlescent cardstock for an extra luxe look!

Video Tutorial
In case you’re a more visual learner, we have a full step-by-step video tutorial that we posted on YouTube – and you can watch it just down below! (Psst: be sure to subscribe to our YouTube channel where we post full video tutorials nearly every week!) ⬇️
Step-By-Step Instructions
Begin by gathering your materials: Cricut machine, cardstock, cutting mat, scoring tool, vellum paper, glue, and battery-operated fairy lights or tea lights.
Download the Heart Lantern SVG file from BetterLifeBlog.com (either by purchasing it individually here or signing up for the VIP Crafters Club).
Unzip the file and upload it into Cricut Design Space. Resize, if desired, and start the cutting process.
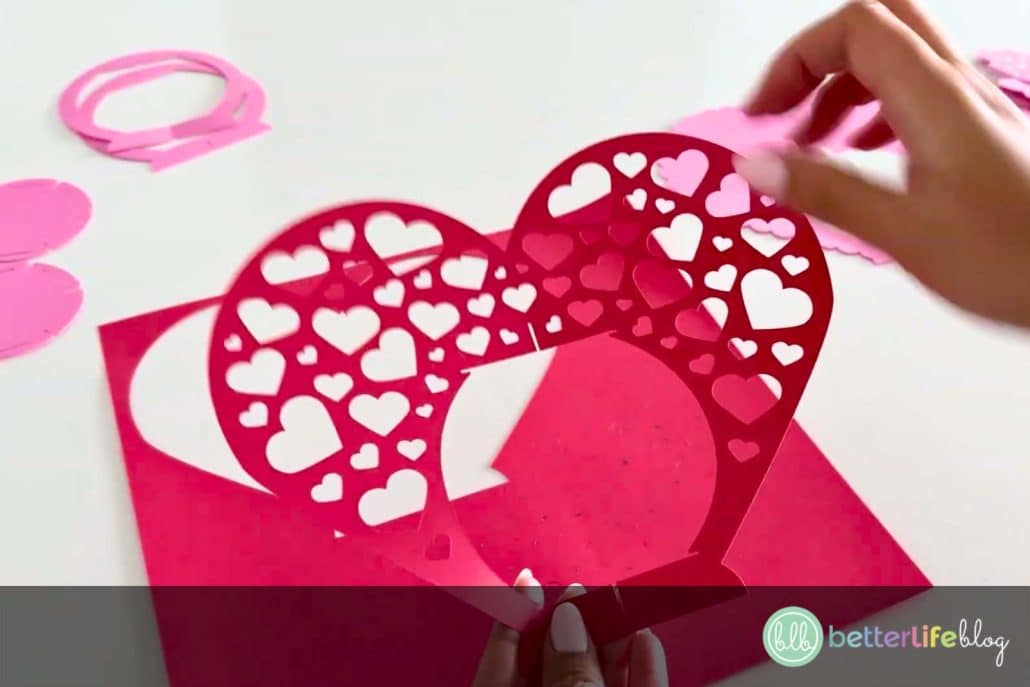
Start by assembling the petal-like pieces. You’ll have 6 that are vellum, and another 6 that have miniature heart cut-outs.

Glue the vellum petal piece onto the petal piece with the heart cut-outs, working from one edge to the center and then to the opposite edge.
Repeat for all petal pieces, ensuring the glue adheres securely.
Now, take the large heart piece (the one with all the heart cut-outs) and glue it onto the solid heart-shaped backing, aligning from the bottom up. We recommend using a precision glue or a glue stick for a secure bond.

Next, grab your two circular pieces to start assembling the lantern stand. You’ll want to interlock the two circular base pieces at their slits. The circular piece with only one slit at the top will go into the bottom slit at the top of the other circular piece.
Next, insert the circular piece’s bottom slit into the other piece’s bottom slit. When interlocked, it almost resembles a snow glob.


Next, insert the two interlocking circular pieces into the large heart to form the lantern’s structure.
Next, grab one of the circular pieces that have the slits along the edges. Match it up to the slits of the bottom portion of the lantern. Repeat with the second circular piece, but this time for the top portion of the lantern.
Now, insert each of the petal pieces into the corresponding slits around the top and bottom of the lantern. Ensure petals are inserted right-side up; they should be removable for light placement.
Insert battery-operated fairy lights or a tea light inside the lantern.
Secure the final petal piece to close the lantern, ensuring a neat finish.
Enjoy your glowing DIY Heart Lantern and display it for Valentine’s Day!

Why You’ll Love This Cricut Craft
✔ Beginner-Friendly: Simple cuts and easy assembly.
✔ Customizable: Choose any color to match your theme.
✔ Perfect for Gifts & Decor: Great for Valentine’s Day, weddings, or anniversaries!
Get the Heart Lantern SVG File
Ready to make your own? Download the Heart Lantern SVG today and start crafting!
Download the SVG file here!
Or, get unlimited access to this and hundreds of SVG files by joining our VIP Crafters Club for just $15/month!
✨ VIP Members Get:
✅ Unlimited downloads of hundreds of SVGs
✅ Exclusive monthly crafting parties
✅ Access to a private crafters’ community
Join the VIP Crafters Club today!
More Cricut Crafts You’ll Love
Looking for more Cricut paper crafts? Try these:
This Heart Lantern Cricut craft is an easy yet stunning project that adds a romantic touch to any occasion. Whether you’re making one for Valentine’s Day, a wedding, or just to add a cozy glow to your home, this 3D paper lantern is sure to be a favorite!
Have questions or want to share your creation? Drop a comment below or tag us on Instagram so we can see your beautiful lanterns!