This post contains affiliate links.
Have you ever tried layering multiple colors of adhesive vinyl (like Oracal 651 or Oracal 631) and messed up? Maybe the alignment was a bit off or you didn’t place it down just right. Well, I have done that before and it is SUPER frustrating! Especially because it’s pretty much impossible to lift and reapply the vinyl once you’ve messed up.
Well, today I’m teaching you a technique that will help to alleviate that frustration. This method uses registration marks that help to align and layer the design perfectly as a single decal before applying the whole thing to your final surface.
For the first part of this tutorial, I will be using the free version of Silhouette Studio, however this exact technique can be done in Cricut Design Space or whatever cutting program you use.
Oh, and in case you’re wondering about the cute FALL (Football Apples Lattes Leaves) Design in this tutorial… this comes from my Fall SVG Design Bundle – the bundle is only $18 and includes EVERYTHING you’ll need for your fall crafting! I am a designer and a crafter and I love making SVG designs to use with my Cricut and Silhouette crafting (yes, I have both machines and I love them). I hope you’ll take a minute to check out my SVG shop! View the Fall SVG Design Bundle here.
Ok, now onto the registration marks tutorial!
But, wait – what are registration marks?
Basically, they are fixed marks that we will use to help us align our design. Every layer will contain the exact same marks that are found at the top in a relative position of the design, so that if you were to layer one on top of the other, the design would come together perfectly. Before applying the design, we will remove the registration marks so that the only thing left is a beautiful layered and aligned design.
I’d like to remind you that this blog post is accompanied by a video, which has some helpful visuals. Please scroll to the top to see this video or click here.

Step 1: Create Registration Marks in Your Design
Open your design in your software (Silhouette Studio, Cricut Design Space, etc.). Add two asterisks (“*”) – on the upper right and upper left hand corner of your design. These are the “registration marks.” You could also use other shapes like squares or circles, but I like the asterisk best because it’s easy to find and the 5 points will make it easy to align your design later on.

Step 2: Make Copies of Your Entire Design with Registration Marks
Next, you’ll need to copy your entire design, including the registration marks and paste it multiple times. How many you ask? As many as the colors you have in your design. This is because you will be cutting each color vinyl separately but the registration marks will exist in each color layer you copy. You can see in this example that I will have 6 copies of the design – one for each color used.
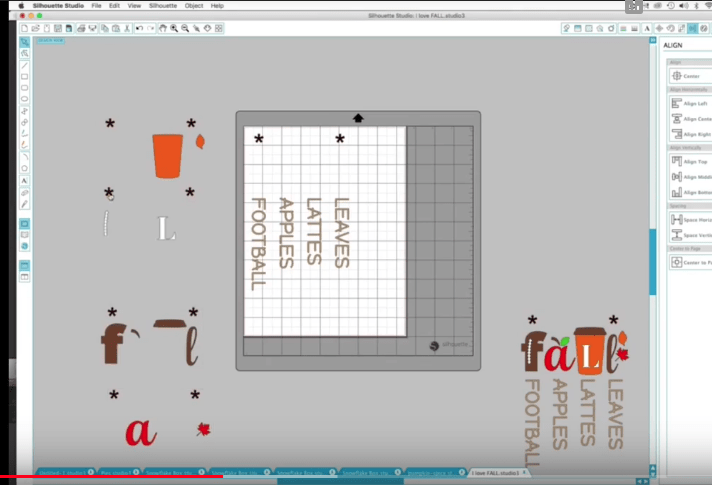
Step 3: Remove Unused Vinyl Colors from Each Copy
Each copy that you’ve made should look identical at this point, however you will need to remove the unused colors from each copy. Leave the registration marks in place, though! If they get moved then you will not be able to align the colors in the next steps. You should end up with something that looks like the screenshot below – each pair of asterisks is accompanied by the contents of that layer only (for example, the orange layer will have the coffee cup, one leaf and 2 registration marks; the brown layer will have the “f”, the apple stem, the coffee cup lid, “l” and 2 more registration marks, the red layer will have the “a”, a leaf and 2 registration marks… you get the idea. (If you are confused at this point, you may want to scroll up and watch the YouTube video. It’s a bit easier to understand.)
Step 3: Cut and Weed Your Vinyl
Arrange your vinyl onto your cutting mat and cut out each design, and weed as usual.


Step 4: Match Up the Registration Marks
Apply some transfer tape (I prefer this transfer tape with the grid lines) to the top-most layer of vinyl. Once you have picked up that layer completely with the tape, take the backing that comes with the vinyl and shift it down so that only the registration marks are uncovered. Then match up the registration marks from layer #1 to the over the registration marks from layer #2. This way all you have to do is match up the registration marks and the rest of the design is protected by the backing. Remove the backing and then you should see that the layers match up perfectly. Repeat this step for each layer.


Step 5: Apply the Completed Decal onto your Final Surface
After repeating step 4, you should have a finished decal that can go on any surface. I applied mine to this cute rustic-looking aluminum sign that I found in the craft section at Wal-Mart.
 I hope you enjoyed this tutorial and found it useful! As a reminder, the design found in this tutorial comes from my Fall SVG Design Bundle – the bundle is only $18 and includes EVERYTHING you’ll need for your fall crafting! I am a designer and a crafter and I love making SVG designs to use with my Cricut and Silhouette crafting (yes, I have both machines and I love them). I hope you’ll take a minute to check out my SVG shop! View the Fall SVG Design Bundle here.
Happy Crafting!